
Automatically Write a Changelog to a Github Repo
A software project may undergo a lot of changes during its life cycle. Each change might be a bug fix, a new feature or deprecation of existing features. All these changes made to a project must be logged somewhere for future reference. A project changelog is documentation that maintains a record of all such changes made to a software project.
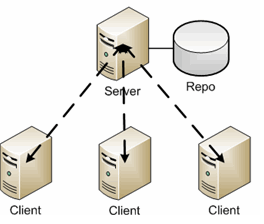
Using changelog or version control is generally a good practice as it helps you to keep track of changes made in each version release. The basic idea is to have a repository where the project code resides and every change made to this code is logged using some version-control or change log software. As shown in the picture below, client commits the code to a central repository which can be shared publicly.
Let’s understand this by an example:
Suppose you are making a simple calculator project. For the first version release you decide to just include basic math operations.So, on your first release, your changelog would probably look like :
Version 1.0.0 – April 2,2017
Features
- Addition, subtraction, multiplication and division of numbers.
- Look back to history of calculations.
Now you decide to work on the project and you added some more features to the calculator project. Meanwhile, users also reported some bugs to the project. So you fix those bugs too in the next release. You now plan to provide small version update. So, the changelog would look like:
Version 1.1.0 – April 9,2017
Features
- Allows calculations with floating point numbers.
- Support for logarithmic,square root and trigonometric calculations.
Bug Fixes
- Fixed where the application would crash if more that 10 digits are used for calculation.
This process would go on and changelogs will be maintained for all the changes made to the project since the beginning of the project.
A simple changelog tool may contain various information such as :
- Version Number
- Date of change
- Bug Fixes
- Features
- Major changes
- Minor changes
- Deprecations
- Comments
Various changelog and version control sofware are available each having features that enhances the process of software development right from designing, development and maintenance. Here are some version control softwares are Concurrent Versions System(CVS), Subversion, Standard Version, Vesta, Git etc.
Standard version is a tool that facilitates easy updates to a remote repository. Standard version is used to commit your package to npm registry using terminal commands.Various benefits of using standard version are :
- Simple commands to commit your work to the npm registry.
- Easy to bump version based on the config file(package.json/bower.json file).
- Manages changelog for all the changes made to the package in each version.(in the CHANGELOG.md file)
- Helps tagging a package release.
Installing Standard Version
There are two ways to install standard version:
Method 1: Installing standard version as npm run script will install the standard-version in the package you are currently working and all the operations would require package.json file to be present in the package folder itself.)
- Browse to your development directory in the terminal.
- Execute the following command in your terminal to add to devDependencies
npm i --save-dev standard-version
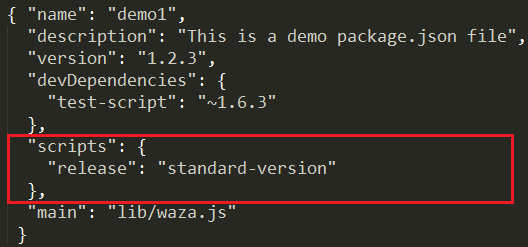
- Create or update the package.json file in your package direcory and add the following npm run script to package.json
{

 "scripts": {

   "release": "standard-version"

 }

}
Here is a demo package.json file for your reference.
- Now run the script by executing following command
npm run release
- Test the installation by executing the following command in the terminal.
standard-version
Method 2: Installing standard version as a global bin will install standard-version globally and will be applicable to all the packages and you need not add devDependencies to each package you are working on.This would require your package.json file to be present in the default user directory instead of a specific package.)
- Type the following command in your terminal to install standard-version as a global bin
npm i -g standard-version
- Test the installation by executing the following command in the terminal.
standard-version
Using Standard Version
Standard version provides terminal commands for seamless communication with the package registry. Let us look at some of the basic operations that are frequently used when you develop and commit a package to the npm registry.
Standard Version Help
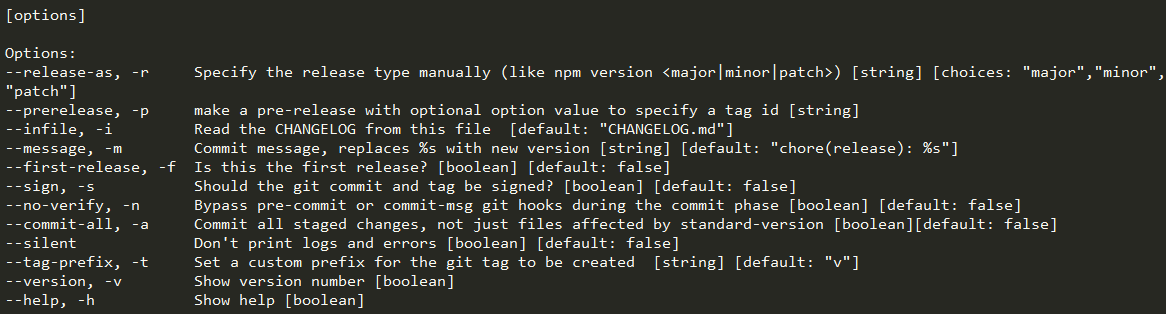
The help command is a life saver when you want to know about a command.Following is the command for the standard version help. It provides you with all the operations that standard version can do for you. Following is the help command for standard version.
- For npm run script
npm run release -- --help
- For global bin
standard-version --help
Here is a sample output for the the command.
First release
This command is used when you plan to release your package for the first time to the package registry.It will tag the release of your package without bumping the version in the package.json file.
- For npm run script
npm run release -- --first-release
- For global bin
standard-version --first-release
Cut a release
You can cut a new release with the following command.
- For npm run script
npm run release
- For global bin
standard-version
Release as command
The release-as command is used to commit all your work to the package registry.The release command may have string arguments like major, minor or patch which are used to bump versions of the package based on your requirement. If you don’t provide any argument to the command, the version will be bumped automatically.
- For npm run script
npm run release -- --release-as [major|minor|patch|'']
- For global bin
standard-version --release-as [major|minor|patch|'']
Let us understand the arguments to the command with our ongoing example of calculator project.You released version 1.0.0.You planned second release with a small bug fix and added two new features.So you need not bump the version to 2.0.0 since it is a small release.Standard Version allows you to release as a minor update to the existing package and you can do it with following command.
- For npm run script
npm run release -- --release-as minor -m "Provided bug fixes and added trigonometric and logarithmic calculations"
- For global bin
standard-version --release-as minor -m "Provided bug fixes and added trigonometric and logarithmic calculations"
Due to a minor release, you get a version 1.1.0 instead of the default 1.0.1
A Patch release (e.g. 1.0.1) is used when your update doesn’t break any thing and provides minor bug fixes and no new features.A minor release (e.g. 1.1.0) is used when you provide new features to your package.And if your changes might break things, you relase a major version(e.g. 2.0.0) of the package.
Here are some important notes:
- Always use the help command to know usage for a specific command
- package.json file is the heart of the package for release as well as installation of packages.It has important information of the package such as package name, author, version number, devDependencies etc.
- All the changes made to the package will be availabe in the CHANGELOG.md file.
- Standard version automatically commits the CHANGELOG.md and package.json file to the package registry while publishing the package.
Other open source software to consider for changelog automation:
- Keep a Changelog http://keepachangelog.com/en/0.3.0/
Downside is it’s dependent on Ruby being installed. - Github Changelog Generator https://github.com/skywinder/Github-Changelog-Generator
Similar to Keep a Changelog using Ruby - Auto Changelog Hook https://github.com/MartinSeeler/auto-changelog-hook
This is actually a bash script which uses git hooks.